Steps to configure Amazon SES with Postfix
These days most websites send emails to their users, e.g., an order confirmation, security warnings, or reset their passwords. Sending emails from the server that don’t land in spam is complicated, mainly when you use a public cloud provider like Amazon AWS, Digital Ocean, or the Google Cloud. Cloud IPs are in general not trusted because it’s possible that these IPs have been used in the past for sending spam or a server got hacked and was part of the DDoS attack.
In this tutorial, you will learn how to use Amazon SES for sending emails via SMTP with Postfix.
- Prerequisites
- What is Amazon SES?
- Amazon SES Configuration
- Postfix Configuration
- Testing
- WordPress
- Conclusion
Prerequisites
Before you start with this tutorial, you have to perform the following tasks
- Uninstall Send mail
- Install Postfix
Amazon Simple Email Service (SES) is a flexible, cost-effective, and scalable email service to help drive higher deliverability and protect sender reputation while sending analytics to measure each email’s impact. Amazon SES is free for the first 62,000 emails you send each month, if you are on AWS. Afterward, you pay about $ 0.10 for every 1,000 emails you send.
Amazon SES Configuration
Before we can configure Postfix to use Amazon SES for sending emails via SMTP, we need to configure Amazon SES first.
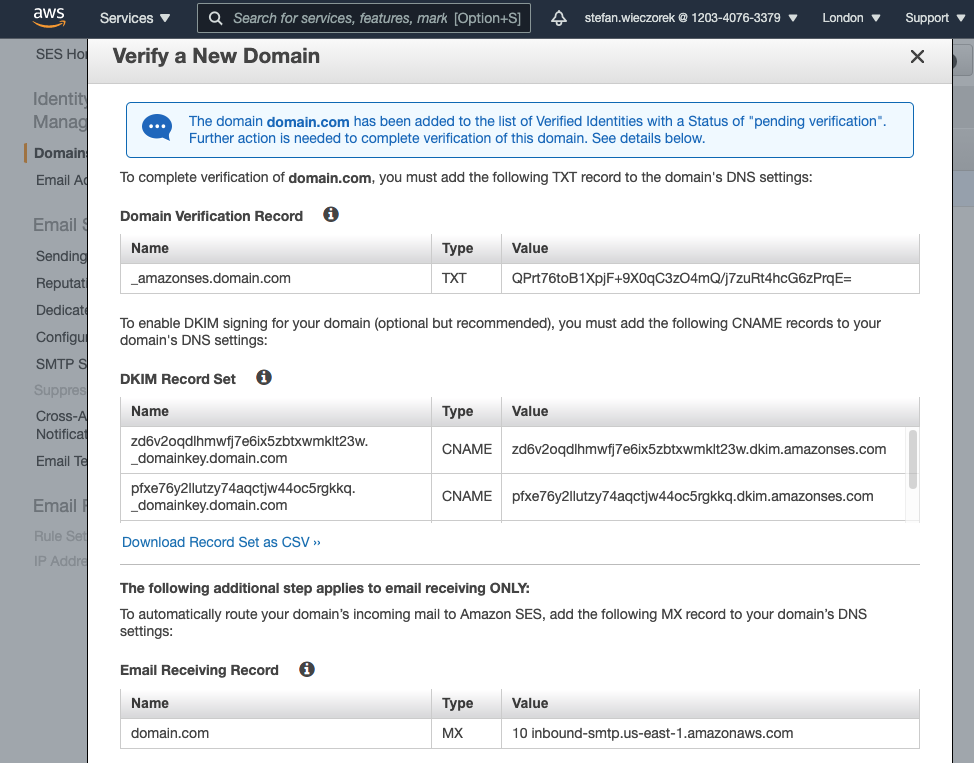
Verify a New Domain
- Login into the AWS SES Management Console.
- In the left menu, click on Domains and then on the button, Verify a New Domain.
- Enter your Domain and make sure to Generate DKIM Settings.
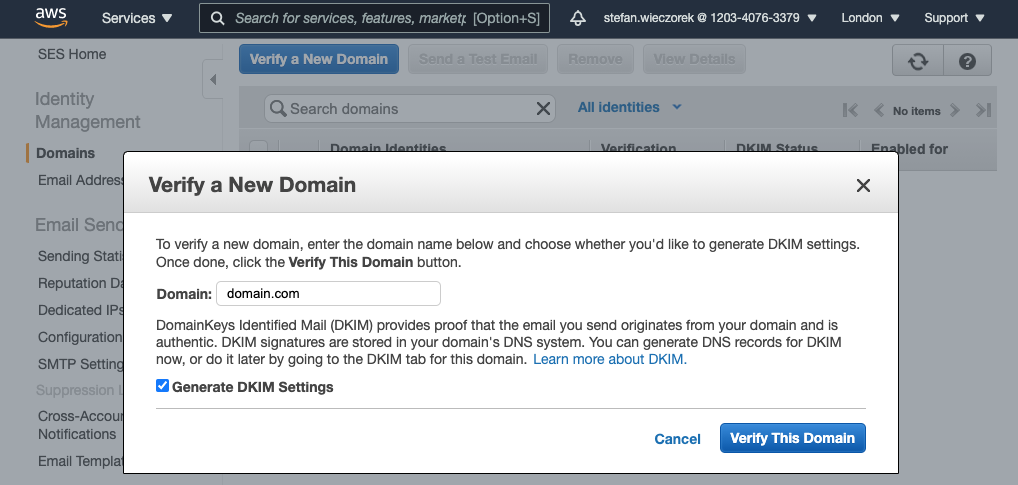
- Add the DNS records to verify the Domain Ownership.
Create SMTP Credentials
For the authentification between Postfix and Amazon SES we need to create SMTP Credentials.
- In the left menu, click on SMTP Settings and then on the button Create My SMTP Credentials.
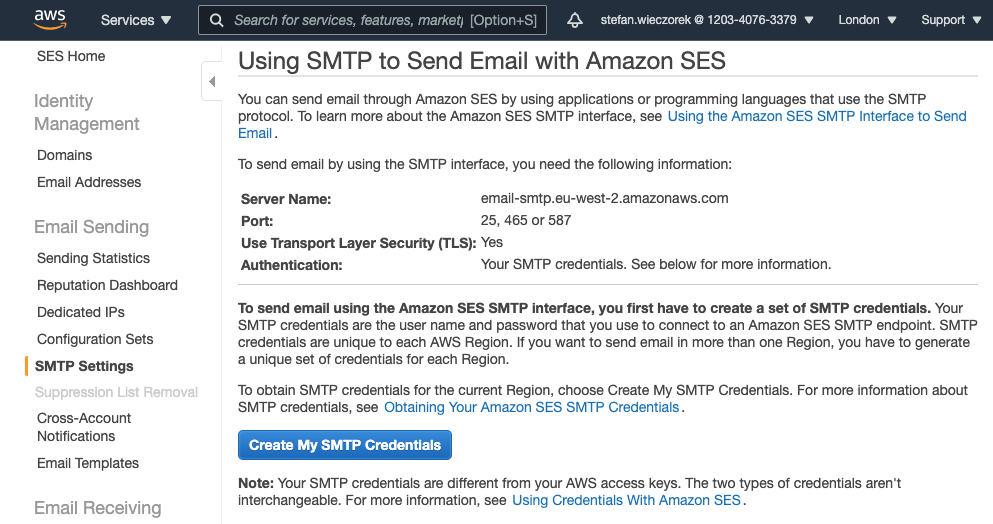
- Enter the IAM User Name and click on the button Create.
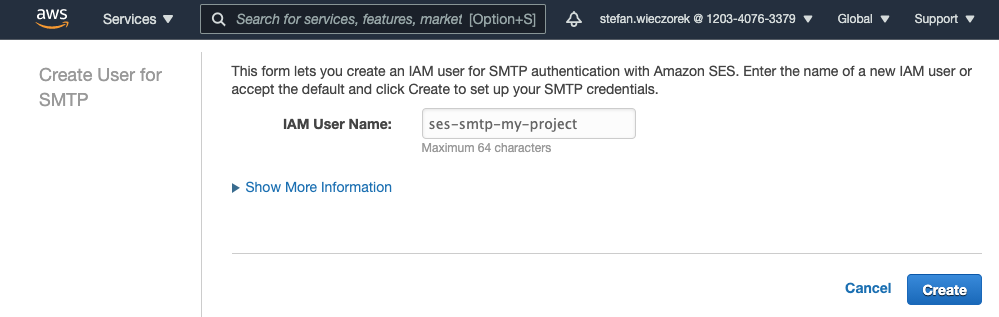
- Copy and save the SMTP Username and SMTP Password for later usage.
Remove Domain from the Sandbox
By default, all Amazon SES accounts are in the sandbox that means you can send only emails to verified email addresses or domains. For using the service in production we need to request Production Access.
- In the left menu, click on Sending Statistics and then click on the button Edit your account details. Fill out the form and wait for a response from Amazon; it may take up to 24 hours.

Postfix Configuration
Our Amazon SES domain is now verified and we can start with the Postfix Configuration.
- Open the postfix configuration file:
sudo nano /etc/postfix/main.cf
- Remove the empty relayhost line and add the following lines at the end of the file:
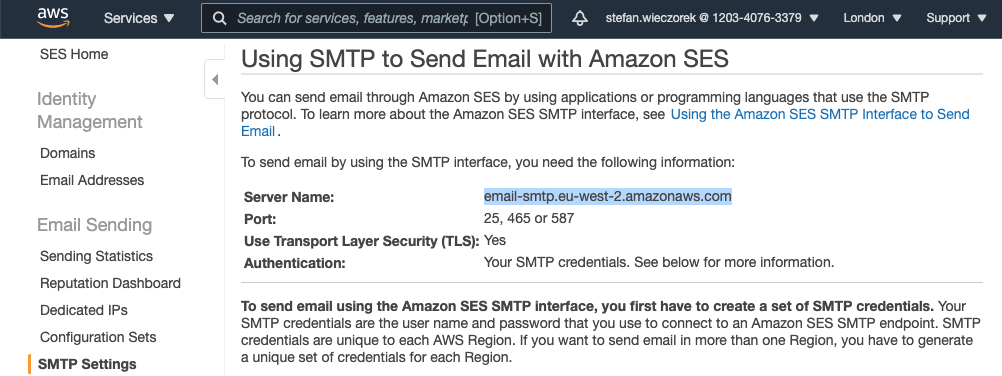
relayhost = [email-smtp.eu-west-2.amazonaws.com]:587
smtp_sasl_auth_enable = yes
smtp_sasl_security_options = noanonymous
smtp_sasl_password_maps = hash:/etc/postfix/sasl_passwd
smtp_use_tls = yes
smtp_tls_security_level = encrypt
smtp_tls_note_starttls_offer = yes
You find the Server Name by clicking on SMTP Settings in the left menu.
- Create the authentfication file:
sudo nano /etc/postfix/sasl_passwd
and add the SMTP Credentials in the following format:
[$SMTP_HOST]:587 $SMTP_USERNAME:$SMTP_PASSWORD
- Hash the authentfication file:
sudo postmap hash:/etc/postfix/sasl_passwd
- Set the owner and file permissions:
sudo chown root:root /etc/postfix/sasl_passwd /etc/postfix/sasl_passwd.db
sudo chmod 0600 /etc/postfix/sasl_passwd /etc/postfix/sasl_passwd.db
sudo chown -R root:root /etc/postfix/
sudo chmod -R 655 /etc/postfix/
- Restart the Postfix service to apply changes:
sudo systemctl restart postfix
Testing
After configuring Amazon SES for Postfix, it’s now time for testing to check if our emails are delivered successfully via SMTP.
Testing from the command line
In the first test, we send an email from the commandline; for that, we need to login via SSH the check and install the mailutils package first.
- We update the package sources and install the mailutils package.
sudo apt update && sudo apt -f install mailutils
- We open a second terminal to tail the mail log file:
sudo tail -f /var/log/mail.log -n1000
- We send a test email from the command line:
echo "Test Message" | mail -s "Test Subject" -a "From:[email protected]" [email protected]
In the mail log you should now see the following line:
Dec 30 08:35:20 cloudpanel postfix/smtp[23435]: C51942171E: to=<[email protected]>,
relay=email-smtp.eu-west-2.amazonaws.com[100.25.176.190]:587, delay=1.6, delays=0.02/0.01/1/0.52,
dsn=2.0.0, status=sent (250 Ok 01000176b2c985ee-2a38d7ff-4cc8-4b60-bf64-fa77cc6545c6-000000)
If you see status=sent then the email has been successfully delivered. You should see the email in your mailbox now. If the email has landed in spam, then your DKIM Records are not correctly set.
Testing via PHP
In the first test, we have tested successfully sending emails from the commandline. In the second test, we test if sending emails via PHP is also working as expected.
- We create a test script like t.php and put this in our document root with the following content that will be accessed via browser later.
<?php
$from = '[email protected]';
$to = '[email protected]';
$subject = 'AWS SES Email Config test';
$message = 'Test Message';
$headers = [
  'From' => $from,
];
$result = mail($to, $subject, $message, $headers, sprintf('-f%s', $from));
- We open a second terminal to tail the mail log file:
sudo tail -f /var/log/mail.log -n1000
- We open a browser and access our test file:
https://www.ashokkuikel.com/t.php.
In mail.log you should see again the following lines:
Dec 30 08:35:20 cloudpanel postfix/smtp[23435]: C51942171E: to=<[email protected]>,
relay=email-smtp.eu-west-2.amazonaws.com[100.25.176.190]:587, delay=1.6, delays=0.02/0.01/1/0.52, dsn=2.0.0,
status=sent (250 Ok 01000176b2c985ee-2a38d7ff-4cc8-4b60-bf64-fa77cc6545c6-000000)
If you see status=sent then sending an email via Amazon SES over SMTP is also working for our PHP APP.
WordPress
By default, you can’t set the E-Mail from name and address for outgoing e-mails, but it’s required for sending e-mails via Amazon SES.
We have developed the WordPress Plugin CLP E-Mail Sender to address this issue.


Leave a Reply
You must be logged in to post a comment.